
5 steps to get started with Pollfish
Last updated June 29, 2020
We pride ourselves on being easy to use, but not everyone is always on the same level when it comes to experience running surveys or using survey tools.
Pollfish has 5 steps for setting up your survey and analyzing your results. With this quick start guide, you will find our top tips for getting familiar with the platform and launching your first survey.

 Step 1: Dashboard
The first thing you see when you come to Pollfish is the MySurveys Dashboard. This is where you will find all of your surveys with options to filter by status such as complete, running, draft, and more. You can also search by date, name, or survey type.
The folder categorization on the left-hand side can be named whatever you like— group folders by the account or campaign you’re running surveys for, or by the member of your team managing them if you have multiple team members using the platform.
More FAQs on Getting Started
 Step 2: Targeting
Targeting is where you will select the audience you want for your survey. Here is where you will choose the total number of completes, or the sample size, of the audience you’re looking for. If you’re unsure about how many responses you need, just use our sample size calculator to help you reach a statistically significant number.
Targeting is also where you can choose from a wealth of geolocation criteria, demographic information, and add up to 3 screening questions to narrow your target audience down to the specific groups you want to reach.
It’s important to note that pricing varies slightly on some options, such as gender and age specifications, or when quotas are enabled. The criteria you choose will be reflected in the price of your survey, which you can see updating in real-time (along with the estimated completion time) in the upper righthand corner.
More FAQs on Targeting
- What countries and languages do you survey in?
- What are all the categories offered in targeting criteria?
- How do I write a screening question?
- How long will my survey take?
- How many respondents do I need?
- How do I target specific age ranges?
- What are the breakdowns of household income I can target?
- Can I edit targeting in a running survey?
 Step 3: Questionnaire
Once you’ve chosen your target audience, you’ll be able to build your questionnaire. The questionnaire page offers 11 different question types, including matrix questions, open-ended question types, and ranking questions.
Some questions offer additional features such as answer shuffling and skip logic or the option to pre-populate your answer choices from a selection of common scales “predefined answers”. You can also add media, such as an image, video, or audio file to question types to test creative types or provide more context to text questions.
When you’ve completed your questionnaire, preview it as a user to ensure a great respondent experience. You can share the link with colleagues to help edit and review. Your responses in preview are not recorded, and will not appear in your results.
More FAQs on Questionnaire
- How do I allow respondents to skip a question?
- How can I ensure a high survey response rate?
- How do I write a good survey question?
- What are the file sizes allowed for image, audio, or video files?
- How do I apply question grouping and randomization?
- Should I use quantitative or qualitative question types?
- How can I avoid survey bias?
 Step 4: Checkout
Once you’ve made it to the checkout page, you’re nearly finished! Here you’ll have a chance to review your targeting criteria, the number of responses you want on your survey, and another chance to share the preview link with any stakeholders in your process.
We use Stripe for payment processing, ensuring a secure checkout experience. Enter your credit card information at this step, and save the card to your file for future surveys. This is also where you can add any discounts or promo codes you may have.
Once this information is entered, you’re ready to launch your survey! It will then be sent to our Customer Experience team of researchers for a personalized review, which typically takes less than 30 minutes. Any issues will be flagged and support will offer suggestions to clarify the problematic areas. If there are no issues, your survey will launch automatically.
 Step 5: Results
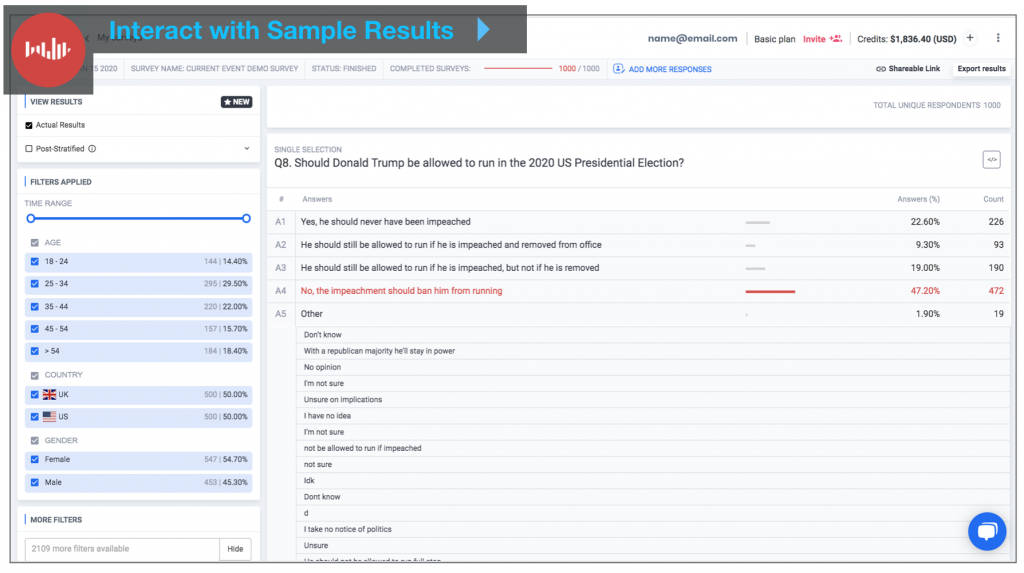
Our results dashboard is the final piece to your survey, offering an intuitive place to slice and segment your responses to look for trends.
Focus on specific questions or demographics by selecting the question or cohort and the dashboard will update to reflect only data from those audiences. Using the shareable link option in the top right-hand side, you can share your dashboard with another member of your team whether or not they have a Pollfish account. Or you can export your results to analyze outside of the platform.
You can also download data visualizations from specific answers to drop into a report or deck, simply by choosing the graph icons below the question and downloading straight to your computer. Just make sure that you’ve created the right audience segment!
Your survey doesn’t need to be finished before you begin viewing your results. Thanks to our real-time recruitment, responses begin the moment your survey launches.
More FAQs on Analyzing Results
- What export options does Pollfish offer?
- How do I weight respondent demographic criteria to ensure a representative sample?
- Does Pollfish offer translation services for surveys conducted in other languages?
- What kind of fraud prevention does Pollfish have to ensure data quality?
- How do I interpret my data in crosstabs?
We’re here to make research easy and transparent. If you ever have any questions about how Pollfish’s platform, pricing, or features work, our 24/7 Customer Experience team is always available on chat. Simply select the chat icon on the lower right-hand corner to get instant support.
For those who prefer to learn on their own, check out our Resource Center for best practices in market research, additional Pollfish tutorials, and survey guides to help you at each step.
Feeling confident? Log into your dashboard or register now to get started!